7 Steps To Starting A Travel Blog (Including Homework You’ll Actually Want To Do!)
The top question I receive from readers, by far, pertains to starting a travel blog and living a life of location independence on their own terms.
Instead of scrambling to reply while on the road — often with limited Wi-Fi — I wanted to create a guide that can help people begin in an informative step-by-step format, with (fun!) homework assignments to make it happen.
Now, there are only seven steps listed; however, I implore you to take your time with each and really put in the thought and effort that’s required to create a successful blog.
BONUS: Make sure to sign up for my FREE travel blogging course, where I share a *new* strategy for turning your website into a sustainable business.
Travel Blogging Strategy [Video]
Prefer to learn through video?
Watch the video above to snag my step-by-step strategy for turning your blog into a profitable business.
This is the exact strategy I’ve used to become a full-time blogger.
Then, continue reading the post.
Pre-Launch Notes
Before you start creating content, keep in mind that it’s important to:
- Sort out the legal side of your blogging business
- Figure out how you’ll do your bookkeeping and accounting as a blogger
From there, you can move on to the creative side of things.
Step 1: Think About Your Blog Brand
Before even setting up your website you’ll want to define your brand.
There’s no point in buying a domain name if you might change it three months later.
Keep in mind the Internet is saturated with travel blogs — some great, some not — so you’ll really need to define your niche and what makes you stand out.
For example, targeting a defined niche like fishing or mountain climbing might seem like you’ll get less eyes on those posts than general travel, but it makes you a true expert to those eyes (and can also help with targeting partners and sponsors down the line).
Moreover, you’ll stand out in this sea of post scribbling vagabonds.
Other ways you may stand out are your voice, an interesting column or series, an interactive design, or unique product or service.
Remember, your brand isn’t just your niche, but your content, domain, design, and voice. Take these into consideration.
Get Blogging:
Find 10 blogs relating to your niche and make a pro/con list.
- What do you like and don’t you like about these blogs in terms of design and content?
- What are they lacking? Where can you fill gaps or do something better?
Refer to this list as you setup your blog.
Step 2: Craft Your Mission Statement
A Mission Statement is one of those things that sounds so simple in theory, but in reality can be pretty complex.
Ask yourself what words you’d like your blog to be synonymous with, what values you want your blog to stand for, what your blog goals are and who you’re writing for.
Think about your answers over a period of time (not in 10 minutes) and write your answers as well as any random related thoughts that come to you.
It also helps to read the Mission Statements of bloggers you admire to get inspired.
Give yourself a break then come back to your notes.
Keeping your brand in mind — your Mission Statement needs to reflect this — write out a draft Mission Statement. Keep it short and to the point, but written in your original voice.
Before publishing, ask friends and blogger peers to give you feedback.
Something I cannot stress enough:
Once you pin down your Mission Statement do not stray from it.
Note:
That’s not to say you can’t change with it and it can’t grow with you.
Don’t confuse your readers by going against your goals, and don’t ruin your reputation and your readers’ trust by selling out.
For instance, if you’re a responsible tourism writer who vows to expose the negative and promote the positive in the industry, don’t talk about the joys of (irresponsible) elephant rides no matter how much a company is willing to pay for a sponsored post.
No quick cash is worth ruining your reputation.
Get Blogging:
Create an About Page. If you need help, I’ve got a great About Page Workbook in my free blogging resource library. Click here to grab it.
A few tips:
- Remember to answer the question “What’s in it for me?” (with “me” being the reader),
- Include at least one great photo of yourself
- Include a story — show, don’t just tell — depicting what makes you an expert on the topic.
Look at other engaging About Pages for inspiration.
Here’s mine, with a few others I love being:
Step 3: Setup WordPress.org
When thinking about how you’ll boost your travel blogger earnings, don’t neglect your content management system.
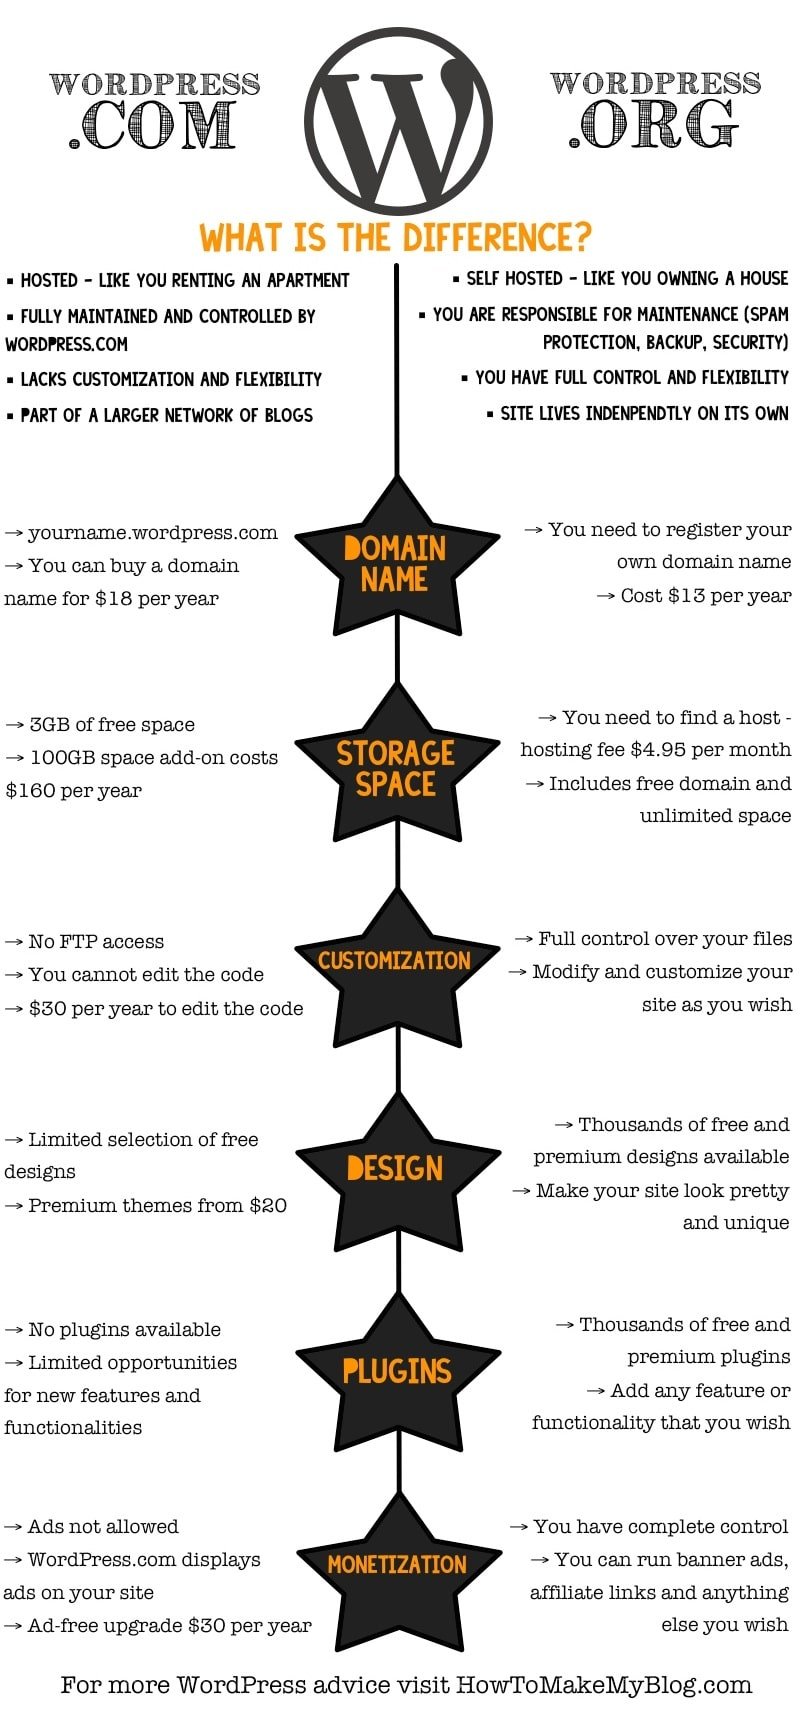
While the free WordPress.com is okay, for full control over the functionality and design of your website — and to monetize it — you’ll need WordPress.org.
You can see the graphic above for more information on this.
This also means you’ll need a hosting package.
I recommend Bluehost as they offer 24/7 support, an uptime average of 99.9%, a simple interface, unlimited domains and disk space, and WordPress recommends it.
Moreover, it’s budget-friendly starting at $3.95 per month.
I also highly recommend paying the extra money — typically less than $20 — to buy the domain (i.e. www.jessieonajourney.com vs www.jessieonajourney.wordpress.com).
It just looks way more professional.
Click here for step-by-step instructions on installing WordPress.org.
Get Blogging:
Setup WordPress.org and purchase your domain and hosting package.
Setup an email account linked to your domain (i.e. [email protected]).
Bluehost offers unlimited emails if you’d like to make a few different ones (ie contribute@jessieonajourney and [email protected]).
Step 4: Come Up With A Content Strategy
What topics will you focus on?
What categories will guide your writing?
Are there any creative series you can do?
For example, I have an Inspiring Travel Stories series.
How often will you post and what types of content?
This might mean one interview, one feature and one photo per week (or whatever works for you).
Remember to add in some evergreen content — content that’s timeless and will still be relevant in years to come.
Get Blogging:
Along with writing one evergreen post — for instance, How To Make Friends When Traveling Solo or Lessons I Learned Traveling Alone As A Female; you can use this list of evergreen content types for help — create a mindmap of your blog.
Let the map inspire the direction you’d like to take it.
I also use mind maps for coming up with thorough and creative content.

Step 5: Setup Your Social Channels
No matter how much you love or hate it, your social media channels are an important extension of your blog.
For instance, if you’re wondering how to promote your blog for free, social media can be a huge help. Plus, these channels offer a great way to gain visibility and grow a community.
But, here’s the deal:
Facebook, Twitter, Instagram, Pinterest, YouTube, LinkedIn, Snapchat, TikTok, Tumblr … they all offer another way to promote your posts, projects, and partners.
Now, you don’t have to sign up for all of them.
Quite honestly, I recommend choosing just one or two to really put the effort into growing.
That being said, you can at least grab your branded name or handle on each. On the channels you’re not using yet, you can pin a message to the top saying something like “I don’t post much to Twitter, but you can find the travel party in full swing on Instagram! Find me there at @jessieonajourney!”
This way, if one day you’re ready to hop on Twitter, you’ll have your handle waiting for you.
Or, at least as close to your brand name as you can; for example, I’m JessOnAJourney on Twitter, not JessieOnAJourney. Definitely setup Facebook, Twitter and Instagram.
Get Blogging:
Setup your channels and get to know some of the popular tools for managing your accounts.
Setup a posting schedule and stick to it as closely as you can.
Scheduling tools like HootSuite and Buffer can help keep your social media channels organized (especially when on the road), while content management assistants like Edgar and RoundTeam have really saved me time on Twitter.
Step 6: Buy A Theme Or Hire A Designer
Your theme (aka the design template) of your website shouldn’t just look professional, it should reflect your brand.
For instance, if you have a budget travel site, don’t have a beautiful theme that makes people think “luxury,” go for a professional theme that says “budget.”
Spirit Airlines and Emirates should both have well-organized, attractive sites, but they should not give off the same vibes.
For those who are really looking to fully bring their own unique vision to life, hiring a developer and designer gives you absolute control.
I used the services of the amazing Michael Pollock — for both of my sites (I also own Epicure & Culture).
You probably can’t tell, but both use the same theme — Michael’s WP-Prosperity — but he customized it for me and tweaked the coding to make them look completely different.
Get Blogging: Look back at that pro/con list from Step 1 and take note of the design elements you do and don’t want.
Then, head to sites like ThemeForest and WPZoom to start perusing.
Click here if you’re interested in my theme, WP-Prosperity.
One theme I highly recommend is X Theme, which I recently downloaded for my tour company site NYC Photo Journeys.
It’s a game-changer for sure!
What makes this different from many themes is it works like a drag-and-drop page builder.
So instead of having to download tons of plugins and additional software, the theme comes with essentially every customizable option you’d need built right into it.
There are 20+ homepage style options built in, as well.
In short, it took months for me to build out my travel blogs AND I had to hire a developer which cost thousands.
It took mere hours to do the same thing on my tour site using X Theme without needing assistance.
If you don’t want to change your theme, you can use a plugin like BeaverBuilder to create drag-and-drop funtionality on your current theme.
It’s what I use to create pages like this one.
Step 7: Get Secure
After getting hacked 1,000 times using GoDaddy and their SiteLock offering (they kept pitching me the base level, which sucked, and then tried to get me to upgrade), I got fed up and switched to Sucuri.
And wow, am I happy I did!
They offer complete website security — as in they scan for, defend against and clean up nasty malware infections — for $199.99+ per year and will backup your entire site for $5 per month.
While this might sound like a lot at first, trust me when I say you’ll pay a lot more than that if you get hacked.
I have hackers try to get into my sites numerous times every month, and I can actually see Sucuri blocking them from doing their dirty work.
I’m extremely happy with the service.
Get Blogging:
Sign up for Sucuri.
While you’re at it, download the free Akismet plugin to protect yourself from spam, as well.
What tips for starting a travel blog would you add?

Hi, I’m Jessie on a journey!
I'm a conscious solo traveler on a mission to take you beyond the guidebook to inspire you to live your best life through travel. Come join me!

Want to live your best life through travel?
Subscribe for FREE access to my library of fun blogging worksheets and learn how to get paid to travel more!


Great tips for the beginners! I’d add ‘don’t give up’ to this list. Blogging can be very difficult and the key to success it to be patient and work hard everyday 🙂
@Karolina: Agreed! Success definitely doesn’t come quick or easy in blogging.
Thank you for sharing. Agree on the security part. I also have Sucuri security on my travel blog http://travel-jaunts.com but do you really need the premium plan??Also for site back up there is BackWpUp plugin which is free.
Hi, We are writing a travel blog since 2015 and will say it does not get many visitors despite all blogs are content orientated. Recently we tried flipboard and had quite better returns with the same content. Any advises?
@Blog: PINTEREST! It’s a traffic generating machine 🙂
Thank you so much for sharing these steps to starting a travel blog & Thank you for your guidance and information.!!
Thanks for sharing the amazing tips to start a travel blog. After reading your article I realize I am lacking with social media channels so now I am going to create social media for my travel blog and will try to use my best travelling photos for sharing and posting. Thanks again for sharing such an informative article and you blog is just amazing.
Amazing article quite informative and helpful. Guest Posting is one of the necessary technique or activity especially for Bloggers. if you are not doing this then you are missing out on some huge benefits that have been proven over and over to drive traffic. If you want your website to rank someday, you’ll need some quality backlinks from authority sites and guest posting could help in this. Make the linkback provided to you after submitting a guest post must be a do-follow backlink.
So cool! Good step by step help. Thanks for the tips!